Agenda Personal report EN
> Manuály a návody > Dokumentace Aktion NEXT
This report will show the details of actual month attendance for selected person, which has to be chosen from the Organizational structure. Name of the person/employee is shown in the headline of the window. The screen layout always depends on the display settings, which can be changed, and then can be different from the picture below.

1. Controls bar
Is divided into several sections:
- Record

- Refresh – will make and update (re-loading) of shown personal report.
- Save – to be used for saving of changes in section Movements, in daily attendance for selected time period, Salary elements (day), Salary elements (time period), Shift plan and Confirmed values.
- Open person – opens detail of selected person and view/change of required information. Can be used for changing of wok timetable, calendar templates and planned shifts (Attendance tab).
- Recalculate – to be used for recalculating of the attendance data of selected person (optional: Recalculating till today / end of period / yesterday / set date. Set date can be configured in Application configuration > Attendance configuration).
- Closure and confirmation

- Check of attendance – will mark the attendance as checked. Checked data can be changed. The check can be cancelled in Deadline agenda or in Personal report.
- Confirmation – will perform the confirmation of attendance data of selected persons. Confirmed attendance data cannot be changed. For changing of attendance data, you have to cancel the confirmation (in Deadline agenda or in Personal report).
- Closing – will perform the closure of attendance data for selected person. Closed attendance data cannot be changed. For changing of attendance data, you have to cancel the Deadline (in Bulk report agenda, Deadline in Personal report agenda).
- Data
- Print – to be used for printing of shown data:
o Worksheet – default print reports with the overview of daily values in actual month.
o Copy


- View

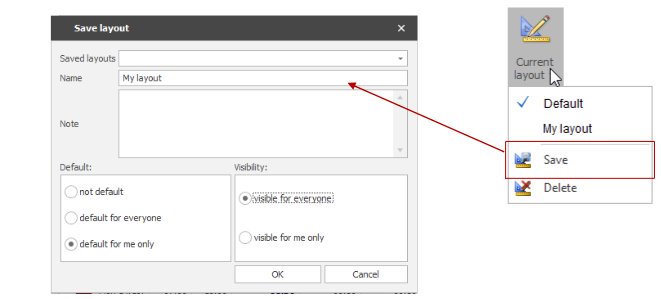
- Current layout – allows saving setting of selected columns (width, order) and other parameters of each agenda window by each user. When saving the layout, you can choose, if this layout will be default for all users or only for current user, and if the layout will be visible to all users or only to the current one.
- Previous – will move you to previous person in selected organizational structure.
- Next – will move you to next person in selected organizational structure.
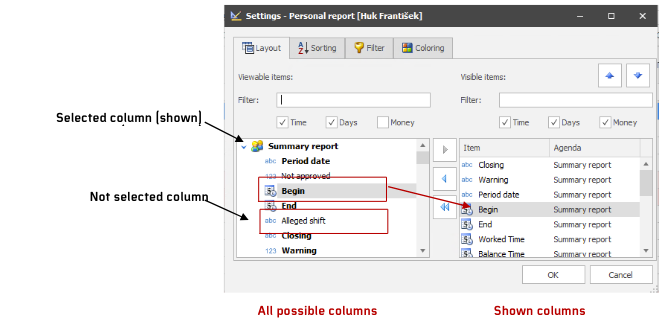
- Selection of columns – with this function you can
define, which columns will be shown in the list of employees and their
attendance data for selected period. The order of shown columns can be changed
with the drag & drop function or by using up and down arrow keys. For
saving, you have to use the Current layout function. In the window with columns
selection, you can find all possible columns on the left side and selected
columns in the right side. The selected columns are also shown bold in the left
section. Selection of columns can be made using these buttons

- Definition of period – to be used for selecting of a time period for shown attendance data. By clicking the cell with name of period, a selection menu will appear.

Changing of periods:

- Window
- Close – will close window with the actual agenda.
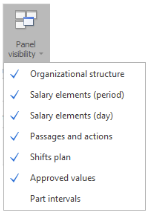
- Panels visibility – default display is in form of tabs for Salary elements (period), Salary elements (day), Passages and actions, Shifts plan, Organizational structure and Approved values. Here you have the possibility to cancel their visibility. After changing the setting you have to save the display.

1. Daily attendance for selected period
Attendance data are divided into days for selected period. By clicking the cells, you can edit the value, if the salary element allows changes (setting of salary element – Editable value parameter).
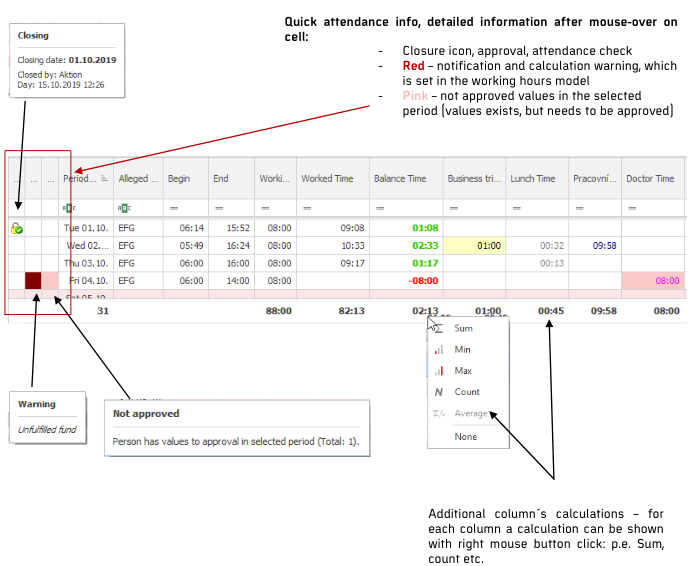
Note: Closed attendance data cannot be changed. If you want to change them, you have to cancel the Deadline in Deadline agenda. In this particular example: after 1.10.2019 the movements and values are impossible to be changed.

Showing/Hiding of columns and their order is described in part of this manual: Controls bar. Font color change can be done for each salary element and is described in part of this manual: Summary of daily salary elements(for selected day).
2. Movements in selected period
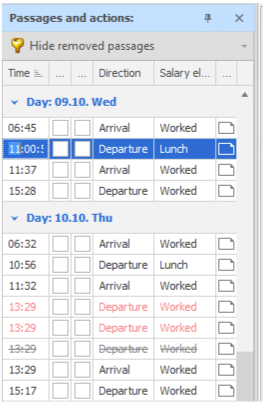
- Editing of existing movements – by clicking the selected value with movement, you can change the value. Details of parameters are described lower in this part of manual – adding new movement.
- Deleting of movements – can be done by clicking this button . Details about the possible restoring of deleted value and color highlight is described in part Movements-colors.
- Adding of movements – new movement by clicking this button you can see the form for adding movement with 4 tabs:
- 1 Action –this choice will add 1 movement for selected day. Useful for example for adding the forgotten movement (arrival/departure).
- 2 Actions – preset choice. Allows adding of two separate movements, most likely the arrival and departure.
- All day – is used for adding the full day event. Can be used for adding Vacations, business trips etc. It is also possible to define a time interval for the full day event, that will be added or with a Generate function, you can set the event automatically for all days until the employee will use the terminal for standard arrival.
- Half-day – will add a half-day event. Can be used for adding Vacations or combination of Vacation and compensatory time off. For a half-day add the start time of the shift and the end time of the shift.
If adding the half-day action, you have to follow these steps: for a half-day, that should be in the first half of the shift, you need to add a start time of the shift, if it should be in the second half of the shift, you have to add the end time of the shift.
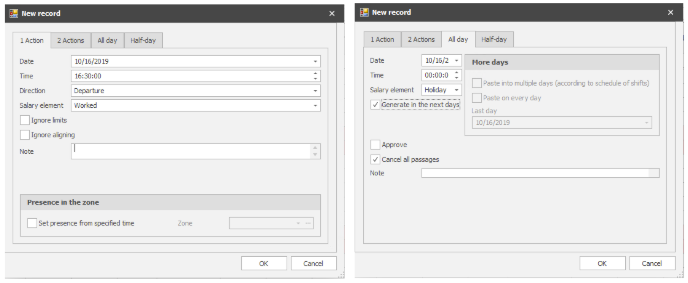
Parameters for the new movement:
- Date – for which date the movements is to be added.
- Time – add time of the selected action.
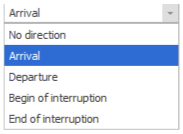
- Direction – you can choose from these options:
- No direction – if you are not distinguishing the direction of movement, choose this option please.
- Arrival
- Departure – leaving from work, departure for business trip, departure for a doctor visit etc.
- Begin of interruption – forced start of an interruption. Used mainly for adding the arrivals via mobile app. Similar situation is with the End of interruption.
- End of interruption – forced end of interruption. Example: standard business trip calculation is till 17:00, but it need to be ended at 15:00. With the movements adding, you would need 2 actions (arrival from business trip and departure from work). In this case you can use the function End of interruption at 15:00 – thanks to this, the automatic generation of a business trip till 17:00 will be interrupted by 1 action in movements.
- Salary element – choice of salary element for adding movement/action. Most used are: Worked/Vacations/Doctor/Illness etc.
- Ignore limits – if checked, no limits will be applied for a set shift.
- Ignore alignment – if checked, no rounding, which is set for shift, will be applied.
- Paste for multiple days (acc.the schedule of shifts) – only two tabs 2 Actions and All day. This option is used for generating movements/actions for time period. Example: Date (from) 7. 10. 2019, Date (till) 11. 10. 2019, Time (from 08:00, Time (till) 16:00, Direction Arrival/Departure, Salary element Worked/Worked, checked Add for more days (acc.the schedule of shifts). After saving, the movements are generated from 7. 10. till 11. 10.2019 for each working day according the schedule of shifts: 08:00 Arrival > 16:00 Departure.
- Paste for every day – valid only for tabs 2 Actions and All day
- Cancel all passages – 2 Actions and All day. If there are some movements in selected days, they will be deleted and replaced only by added movements/all day actions.
- Generate in next days– only valid for tab All day. With this option selected, the date of end will be deactivated and date of interruption will be automatically generated till the Arrival will be registered.
- Approve – All day and Half-day. If the salary element is subject to an all-day approval, it is possible to mark it as approved automatically by selecting this option.
- Note – if you are manually creating a movement, we recommend to add a note (example: reason for editing), therefore the person responsible for check of attendance (usually different person), will be able to find out this reason of editing.
- Paste second part of half-day – if you are adding for example half-day Vacation and half-day compensatory time off, choose this parameter and fill in the salary element and time.
2 Actions:
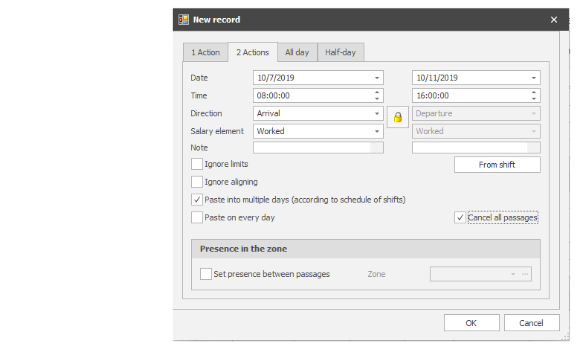
Presence in the zone – if you are manually editing the movements, you can also manually set the presence of an employee at the workplace. Choose zone, in which the employee shall be marked as present. If you are manually adding 2 movements, the preset “Lock” function is active in tab 2 Actions. This lock will close the direction of movement and salary element of the second action, it also automatically sets up the opposite movement and same salary element of the second action as for the first one. In case the “lock” function is deactivated (by clicking the lock icon), you can set different salary elements for both actions and different/same direction of movements. Salary elements, which will be offered in the selection, can be edited in the details of a work time model (tab Order of salary elements for editing). There you can select which folders will be shown and what will be their order of appearance.
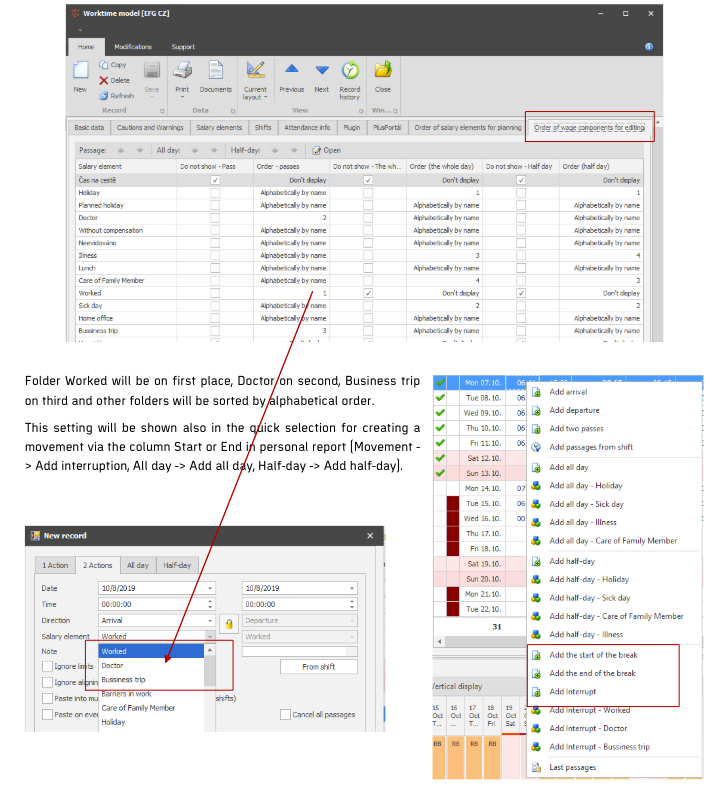
Color distinction of movements:
- black – movements from attendance terminal, SW terminal mApp etc.,
- violet – system generated movements, example: non-registered departure,
- orange – duplicated movements, example: 2 departures within 1 minute,
- blue – manually added movement or edited movement from attendance terminal,
- gray, movement crossed – deleted (removed) record. In the default setting, the deleted records are not shown. If you want them to be shown, you have to switch on the function View removed.
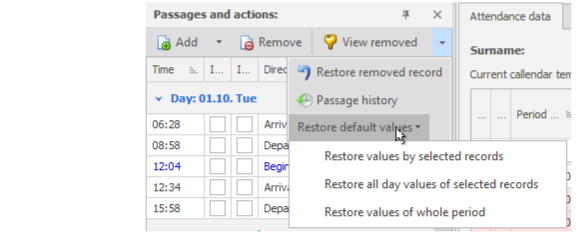
Other possibilities are: restoring the deleted record or records for whole period and viewing the history of selected record (a summary will be shown with information about who/when/which record was a subject to change).
2. Salary elements summary (for selected day) and manual changes
In this section you can view the calculated elements for each employee or selected group of employees in a selected time period. Where allowed, you can change the salary elements. Manually changed values are prioritized and can override the calculated values. They are also colored (yellow background). These values will not change even after the manual recalculation (movement values, from which they were originally calculated, are than ignored). Therefore we suggest changing the values of movements in Personal reports agenda rather than changing the calculated results. Colors and font types of salary elements can be set in Salary elements agenda, section Font. Colors of editing and other changes in attendance can be set in Application configuration agenda, tab Attendance configuration.
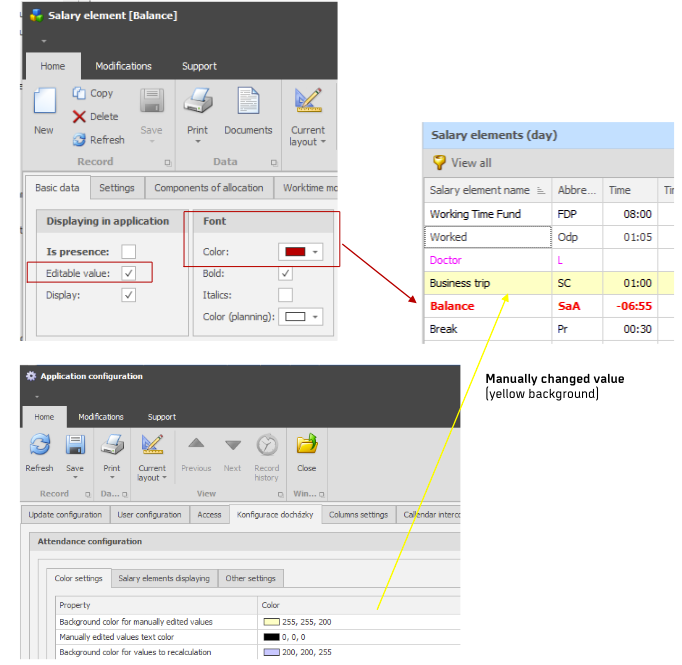
With button Show all/Hide empty you can switch between the view of all salary elements and salary elements with values
3. Shifts plan
In this agenda you can add/cancel/change the shift for a selected day to a selected employee.
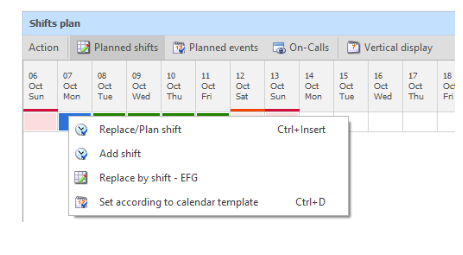
- For quick adding of the shift, click on the right mouse button on cell in selected day (or mouse select more days). With function Replace by shift – EFG (EFG stands for a name of the shift in this manual) you can quickly add a shift for selected day, or you can choose Replace/Plan shift and in next step select the shift from a list.
- By selecting Remove shift you can cancel the shift for selected day/s.
- Set according the calendar template – for selected day/s the shift will be planned according the valid calendar template from the attendance rule.
4. List of values for approval
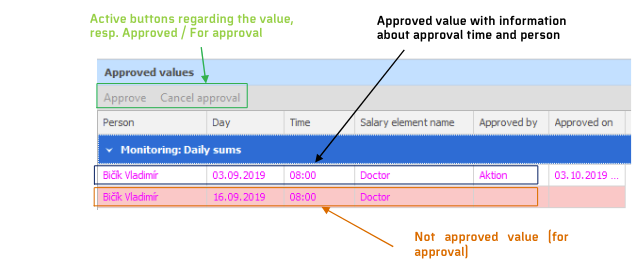
For salary elements type Movement, you can set an approval rule. That will cause a necessity of an approval by appointed person (such as manager) for each interruption of work. In the shown example you can see salary element “Doctor”. Already approved value can be canceled (return to status For approval).
Modifying the work environment (rearranging windows):

Each user has a possibility to modify the view and arrangement of windows
within the Bulk report agenda: Salary elements (periods), Approved values and
Organizational structure. By right mouse click & drag on
the window top you can move the window. When the window reaches a position
suitable for new location, a symbol of window arranging ill appear. With a mouse
over on one of these symbols  the
location bar will be highlighted. When you release the left mouse button, window
will be settled in the location. To save the view you have to use function of
Current layout.
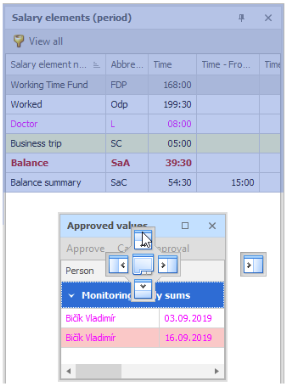
Connections in between windows in Personal report agenda
In the main window with selected person you can see the calculated values of Salary elements (day) in selected day. Salary elements (period) are showing calculated values for selected period. In window Approved values you can see all values which are subject to approval, or which have been already approved for the selected period.
Attendance calculation process:
- automatically – on background
a. after each movement of a person, the automatic recalculation of attendance data is made
b. after manual change of movement and saving of this change
- manually – by using the button Recalculation – a special window ”Calculation result” with the status of calculating operations is shown.