Closing, confirmation, checking attendance EN
> Manuály a návody > Dokumentace Aktion NEXT
Closing or Approval is used by managers for closing the attendance data for selected persons and selected time period. Approval can be used as a first step of attendance control, Closing as the second step. Both actions can be done in Personal report or Bulk report agenda by selecting person/s and clicking the Closing or Approval.
Check of attendance is usually used for marking the attendance data by employee – that means, employee is confirming his/her attendance and then the data can be processed by superior employee/manager. The process of Check of attendance does not close the data, so it is still possible to edit movements, values etc.
Closing
Is a third step of attendance check. After Closing the attendance data are closed and cannot be edited, if the Closing is not cancelled. Closing is used by superior employees/managers for checking the attendance, closing it and then sending it for the salary calculations in financial department.
Closing is accessible from the Windows client and also from the web app.
Setting of permissions for attendance closing
You can set the right to close attendance data of employees to any user from the list > in details of selected user > tab Permissions to records in Agendas – Persons.

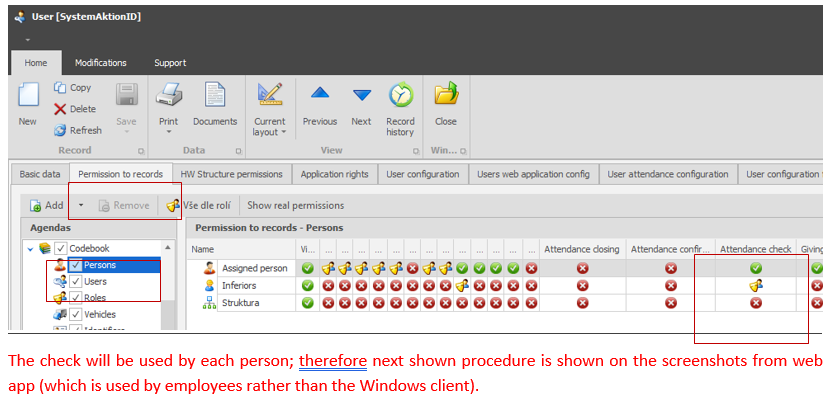
Assigned person – rights for selected user himself/herself
Inferiors – rights for inferior person, member of team
Structure – rights for organizational structure
Closing of attendance – example
- Check attendance movements, calculated values and other data. Make sure that there is no need to approve other actions like Vacation, Doctor etc. – if they are subject to approval.
- Attendance can be closed in 2 ways – in Personal or Bulk report.
- Personal report – use the Closing function
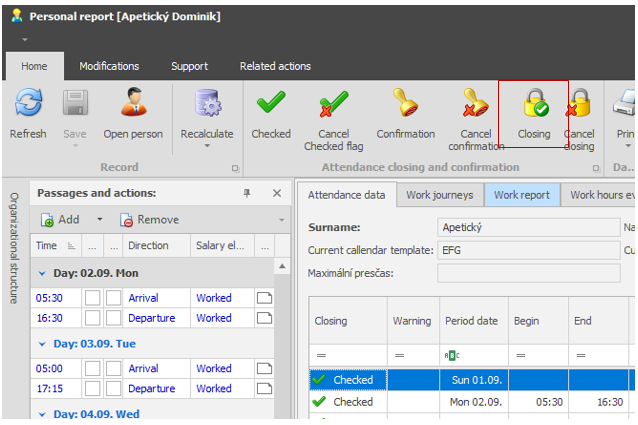
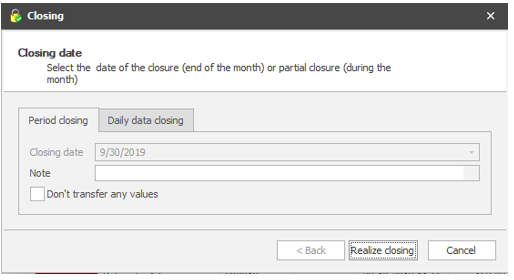
In next step choose which values shall be transferred to next period and which shall not be transferred and shall be deleted (column Time – Transfer).
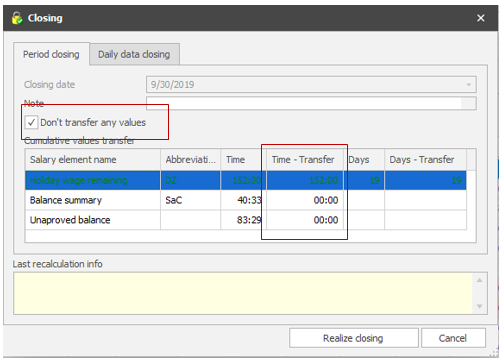
If no editable salary values shall be transferred, choose “Don´t transfer any values” option. For salary element Vacation-balance the values remains the same for this example, because this folder is not editable. Than realize the Closing of attendance.
After clicking on Realize closing, the attendance data will be closed for selected person. If the persons have some unapproved salary elements (p.e. Doctor), this window will appear:
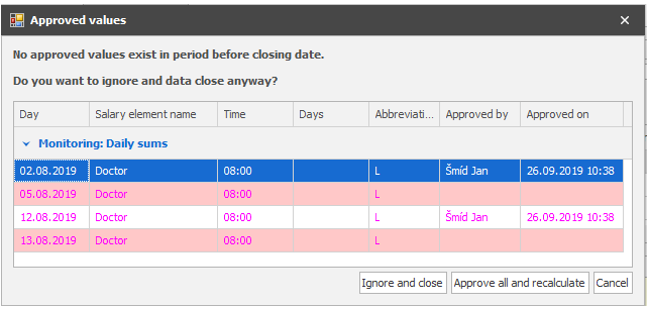
Options:
- Ignore and close – unapproved interruptions will be ignored and the time used for them will be taken as an absence. With these parameters the attendance will be closed.
- Approve all and recalculate – will perform the approval of all values and recalculation of the attendance date of selected person. Then you need to check attendance and close it.
- Cancel – the attendance closing will not be performed.
Note: After closing, we recommend to check, if the final values changed by (for example) the movement of edited person in the mean time, while the recalculation and closing was performed.
- Bulk report – select persons for attendance data closing and use function Closing.
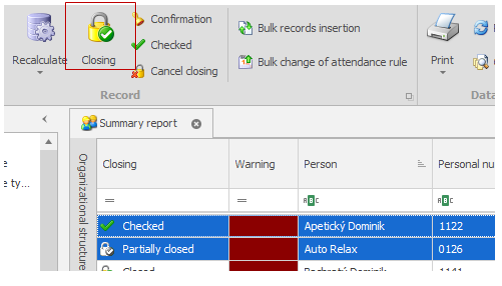
If no editable salary values shall be transferred, choose “”Don´t transfer any values” option. Than realize the closing of attendance.
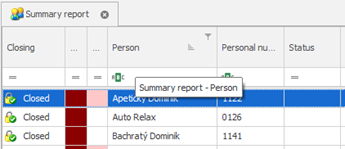
Closed attendance is shown by the ”lock” icon in Personal and Bulk report agenda – column Closing.

How to make closing before the end of time period?
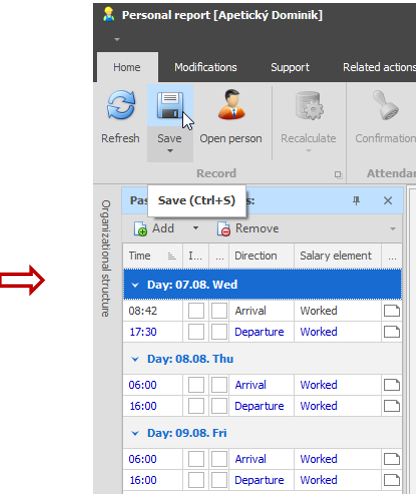
1. Adding the missing movements/all-day actions till the end of time period to selected persons.
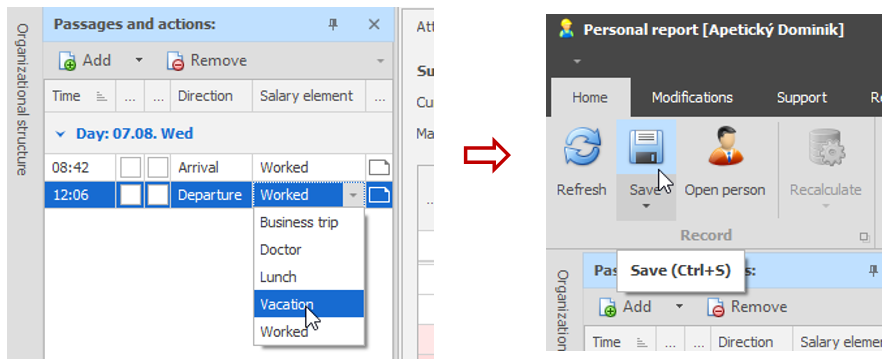
- If the employee is going for a Vacation and has not marked this in the last movement, you can add it manually and start generating the Vacation values till next arrival. After last departure you have to click on the name of salary element, choose Vacation and save the record.
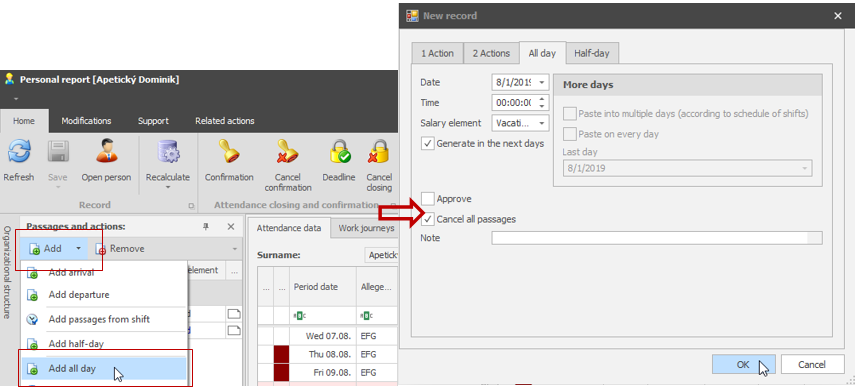
- You can also set up the generating of all day actions till next arrival. Click into the area of calculated values – on date, from which you wish the all day actions will start to be generated and then click on “Add” in the Movements and actions window. By this the date is automatically chosen. Choose Add All day by quick option for adding the movement. Check the option Generate in the next days and save the record.
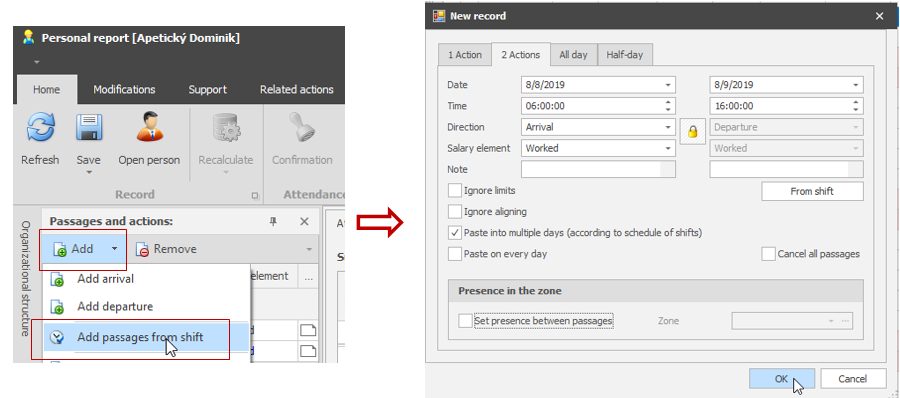
- In other cases you can setup the daily generated arrivals and departures according the shifts plan – you can use the quick option of adding the movements according the shifts plan. Choose the start date and end date, check the option Paste into multiple days (according the schedule of shifts) and save the record.
2. Recalculation till the end of period.
In Bulk report or on Personal report click on arrow below the Recalculate icon and choose “Calculation till the end of the period”. Icon will then be highlighted with exclamation mark. After clicking on the icon, the attendance data will be recalculated till the end of the period for selected person/s – if month is selected, than till the end of the month.
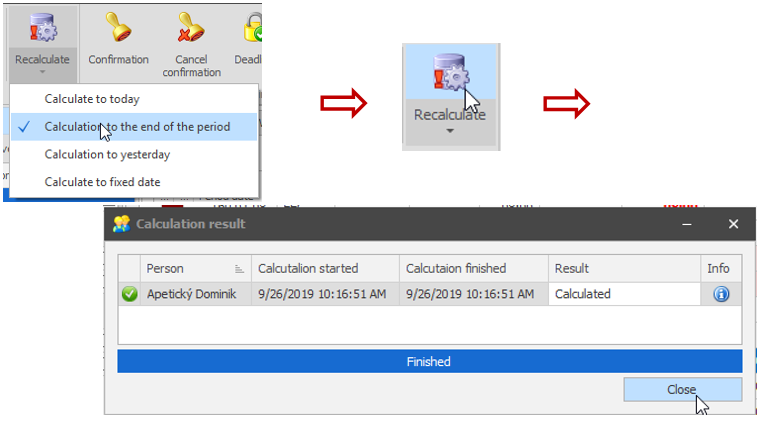
Note: If you will set the value “Calculation till end of the period” in Bulk report > Recalculation, it will be automatically selected also in Personal report for selected person.
3. Closing.
- In Bulk report choose persons you want and click on Closing or in Personal report of the person, click on Closing.
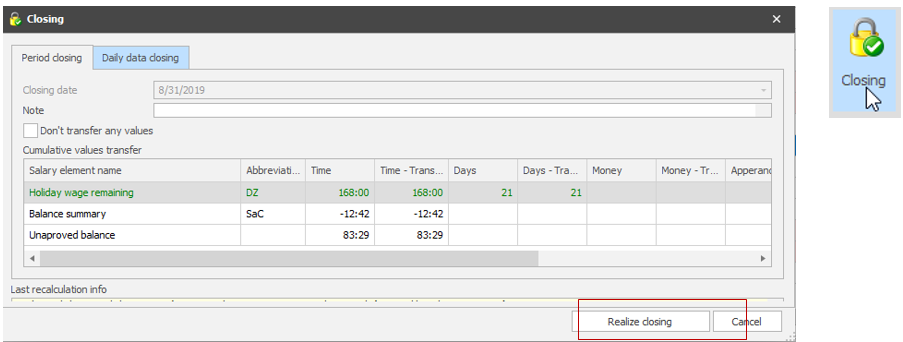
- After the click on Realize closing, all attendance data for selected person will be closed. If the person has some unapproved salary elements (p.e. Doctor), this window will appear.
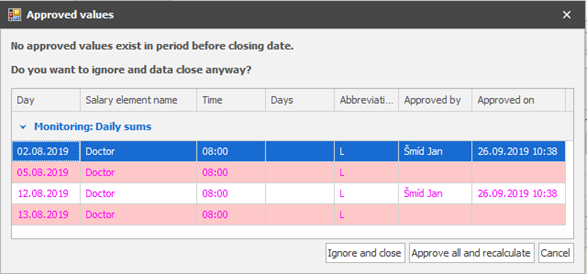
- Options:
- Ignore and close – unapproved interruptions will be ignored and the time used for them will be taken as an absence. With these parameters the attendance will be closed.
- Approve all and recalculate – will perform the approval of all values and recalculation of the attendance date of selected person. Then you need to check attendance and close it.
- Cancel – the attendance closing will not be performed.
Note: After closing, we recommend to check, if the final values changed by (for example) the movement of edited person in the mean time, while the recalculation and closing was performed.
Closed attendance data are marked with the "lock” icon in the column Closing:
Bulk report
Personal report
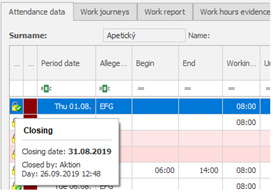
If you perform a mouse over the lock icon, you can see the date of closing and by whom it was closed and when.
Closing cancellation
Closing can be cancelled directly from Personal report of selected person or from Bulk report.
In Personal report
- Open the Personal report agenda (Attendance) and choose the person.
- Click on cancel closing icon in the control bar in section Closing and confirmation.
- Choose closing that you wish to cancel (can be also older than last month) and click on Cancel selected closing.
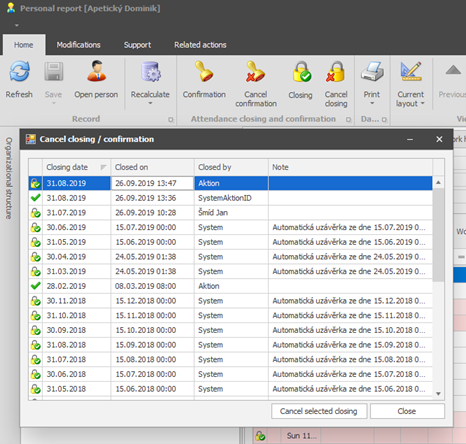
4. Edit the attendance of selected person and close.
In Bulk report (bulk closing)
- Open the Bulk report agenda (Attendance) and choose persons for which you want to perform cancelling.
- Click on cancel closing.
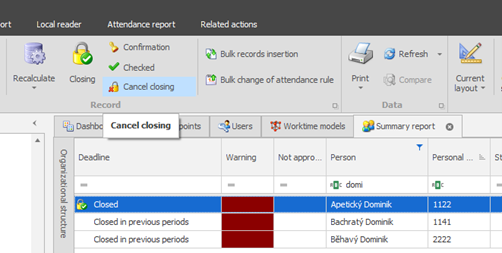
3. Set a date till which the closing shall be cancelled and click on Cancel closing button. If the person does not have a closing for previous period, it will be than automatically created.
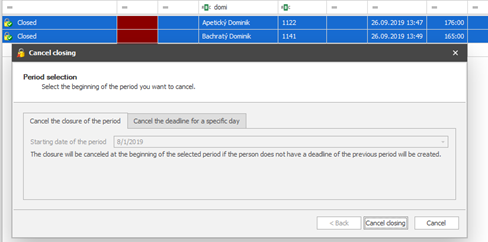
4. Wait for the confirmation or error message.
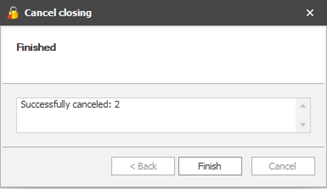
5. Edit the attendance for selected persons and then close again.
Blockade of closing
You can set the blockade of closing, if the values summary of salary element is not achieved or is exceeded (p.e. balance). Example of the blockade setting in case of negative monthly balance or in case of exceeding 40 hours per month is shown below.
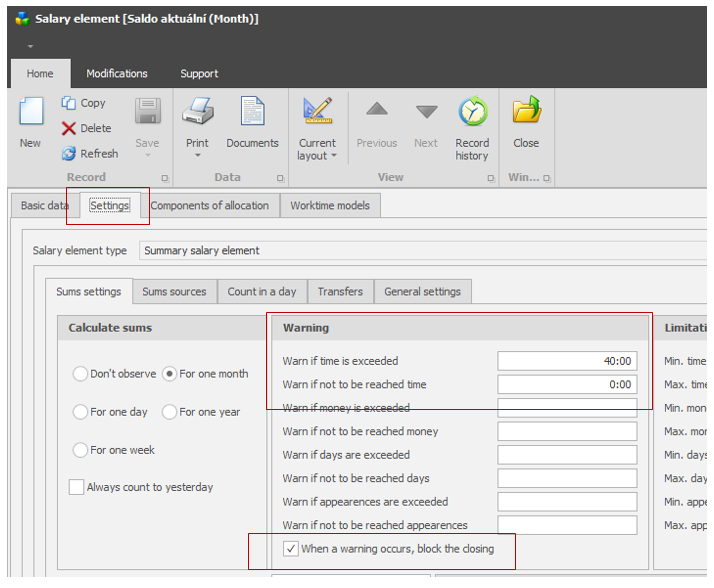
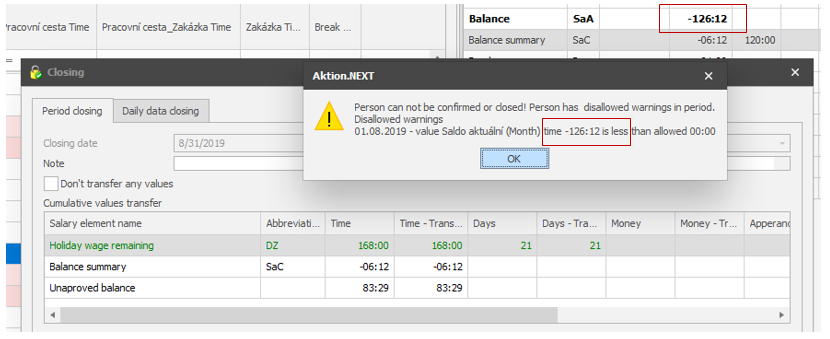
Confirmation
Is a second step of attendance check, after which the attendance data ale closed. Closed data cannot be changed, if the closing itself is not cancelled. It is used by superior employees or managers for checking and confirming the attendance and passing for a closing. The confirmation is not required in the system and data than can be closed without previous confirmation.
Data confirmation is available in Windows client and web app.
Setting permissions for attendance confirmation
You can set the right to confirm attendance data of employees to any user from the list > in details of selected user > tab Permissions to records in Agendas – Persons.
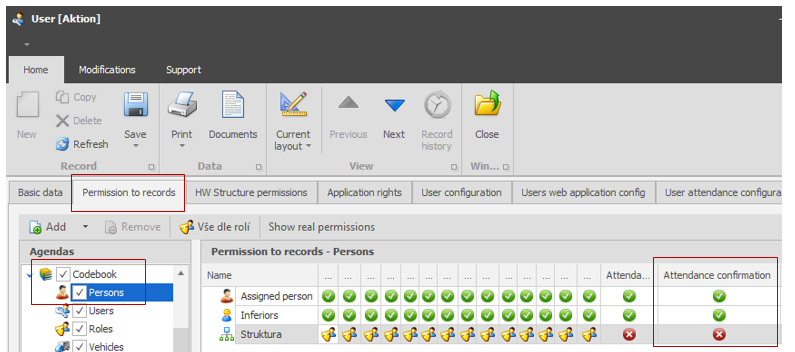
The system of confirmation, data transfer for next periods and approvals are the same as in Closing – you have to use buttons Confirmation and Cancel confirmation.
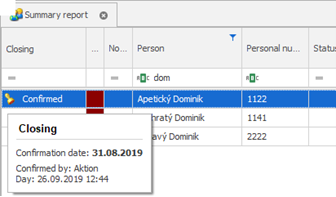
Confirmed attendance data are marked with a ”Stamp” icon in the column Closing:
Bulk report
Personal report
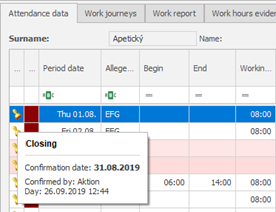
If you perform a mouse over the stamp icon, you can see the date of confirmation and by whom it was confirmed and when
Cancellation of confirmation
Confirmation can be cancelled in the same way as closing from Personal report of selected person.
In Personal report
- Open the Personal report (Attendance) and choose person.
- Click on Cancel confirmation in controls bar in section Closing and confirmation.
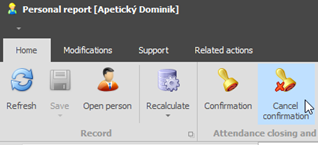
- Choose confirmation, that you wish to cancel (can be also older than from previous month) and click on Cancel confirmation.
- Edit the attendance of selected person and create a new confirmation.
Confirmation requirement before closing
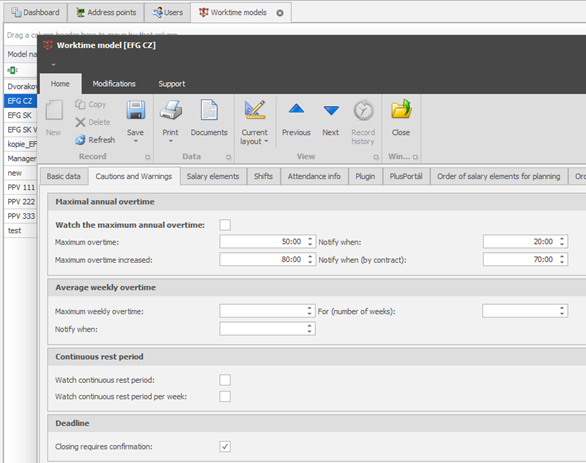
You can setup a rule that will require the necessity of confirmation of attendance data before the closing. Then it will not be possible to close the attendance without confirmation. Setting can be made in the details of working hours in tab Cautions and warnings – parameter Closing requires confirmation.
Check of attendance
Is a first step off the attendance data and movements control. During the check, the attendance date are not closed and the possibility of editing or recalculation is still available. Data are closed for editing only in the next higher steps – confirmation or closing. The check is usually performed by employee himself/herself. The check is not required in the system and data can be directly confirmed/closed by superior employee/manager.
Check of attendance is available in the Windows client and in web app. In web app the function is exactly the same as in Windows client.
Setting permissions for attendance check
The right for attendance check of employees can be set in the details of each employee – tab Permissions to record – Agendas – Persons.
The fight for attendance check is usually set for the system user used by normal employees.
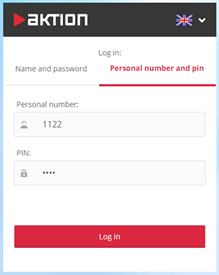
- Employee will log into the web app (p.e. http://dochazka.aktion.cz)
- He/she will open the personal report and check the attendance data. If they are correct the superior employee shall then confirm/close the data.
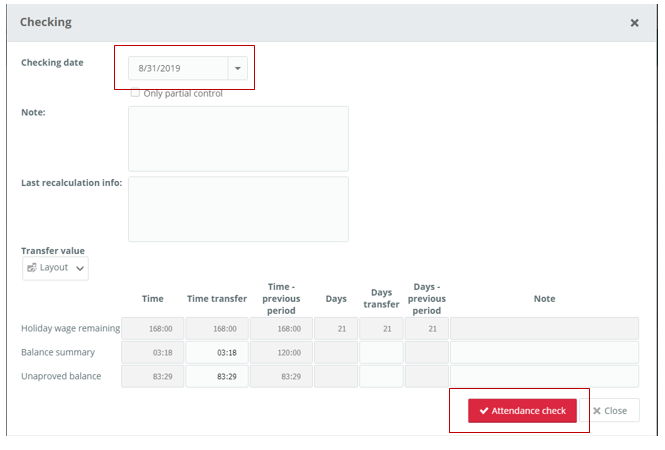
- Click on Checking button.

- Choose the date, till which the data shall be marked as checked.
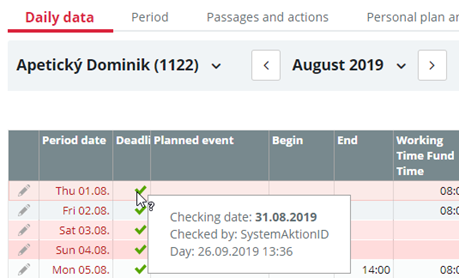
- Data, which were checked, are now marked with green check mark icons. With a mouse over the icon, you can see more information about the check.
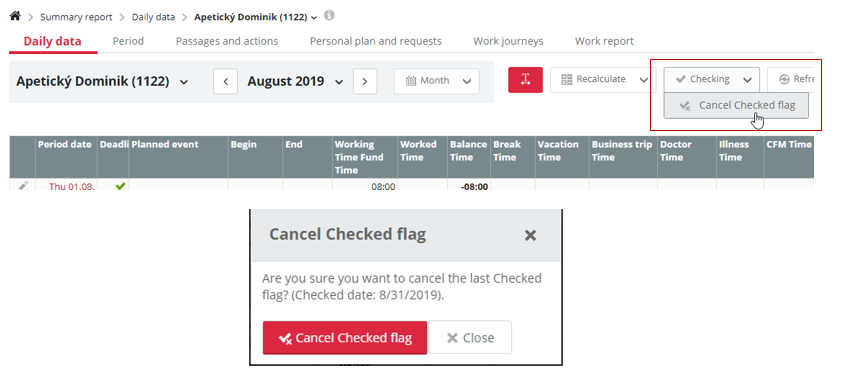
Check cancellation The cancellation of check can be made by clicking the Checking button and then select Cancel checked flag.
After editing of data, you can mark attendance data as checked.