BTeModul and application eCard – user guide
> Hardware > eSeries
Basic information
BTeModule is used to read virtual cards from the Aktion eCard mobile application. It is designed for connection to eSeries and AXR series sensors. BTeModule can be ordered together with the sensor or can be added to an existing system. In one system, physical cards can be used in combination with virtual eCard cards on users' mobile devices.
Types and markings
| BTeModul | ES-yxx/z/BTe | AN-904 (licensed) |
BTe-2 Modul |
|---|---|---|---|
| A separate
module for the series sensors: ER-3×x/5×x AXR-1×x/2×x/3×x |
ES series sensors are supplied wih a built-in BTe module. The module cannoot be purchased seperately. If retrofitting is required, the eSmartReader must be sent to the manufacturer. | Virtual eCard for your mobile device. | Added the option to block the reader when the intrusion alarm system (EZS) is active (applies to eReader only). |
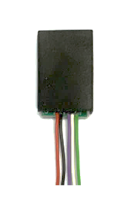 |
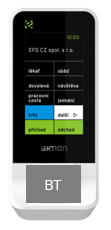 |
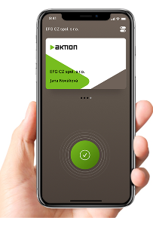 |
 |
Technical parameters of BTeModule
| Rated supply voltage | 12 VDC max. |
| Protocol | Bluetooth 5.2, Low Energy |
| Frequency | 2.4 GHz |
| Bluetooth module | Silabs BGM220P |
| Processor | 32-bit ARM Cortex-M33® |
| Transmitting power | Max. 8 dBm |
| Security | Secure Boot with Root of
Trust and Secure Loader (RTSL) Hardware Cryptographic Acceleration for AES128/256, SHA-1, SHA-2 (up to 256-bit), ECC (up to 256-bit), ECDSA, ECDH |
| Memory | 512/32 kB Flash/RAM |
| Operating temperature | –20 to +60 °C |
| Reach | Max. 10 m (depending on location and surrounding enviroment) |
Functionality Update
Starting from version 4.5.4.7315 of the Aktion.NEXT system, a new functionality is available for the BTe-2 Module that allows blocking the reader when the intrusion alarm system (EZS) is active. To use this functionality, it is necessary to enable the „Lock reader“ parameter through the Aktion BTe configurator service application. . This version also introduces a new communication protocol between the BTe-2 Module and the eCard application, optimized for enhanced security and more efficient data transfer. Older communication methods are no longer fully compatible with this functionality; therefore, eCard version 2.0.0 or higher is required.
BTeModule installation and connection
BTeModul
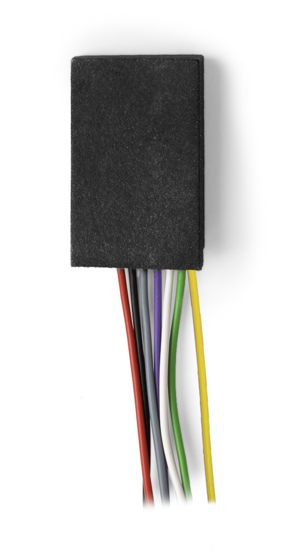
Cable colours

Red – Module power supply positive pole +12 VDC.
Black – Power supply module negative pole GND.
Gray – Service wire, used for initializing the module to service mode, it is not connected.
Purple – Transmitting data wire for eSeries sensors, plugs into the Rx terminal on the sensor.
White – Transmitting data wire Wiegand W1 (D1), connects in parallel to the AXR sensor or directly to the input of the eXpander, KMC, MMC control unit.
Green – Wiegand W0 (D0) transmit data wire, connects in parallel to the AXR sensor or directly to the input of the eXpander, KMC, MMC control unit.
BTe-2 Module
Cable colours

Red – Module power supply positive pole +12 VDC.
Black – Power supply module negative pole GND.
Gray – Service wire, used for initializing the module to service mode, it is not connected.
Purple – Transmitting data wire for eSeries sensors, plugs into the Rx terminal on the sensor.
White – Transmitting data wire Wiegand W1 (D1), connects in parallel to the AXR sensor or directly to the input of the eXpander, KMC, MMC control unit.
Green – Wiegand W0 (D0) transmit data wire, connects in parallel to the AXR sensor or directly to the input of the eXpander, KMC, MMC control unit.
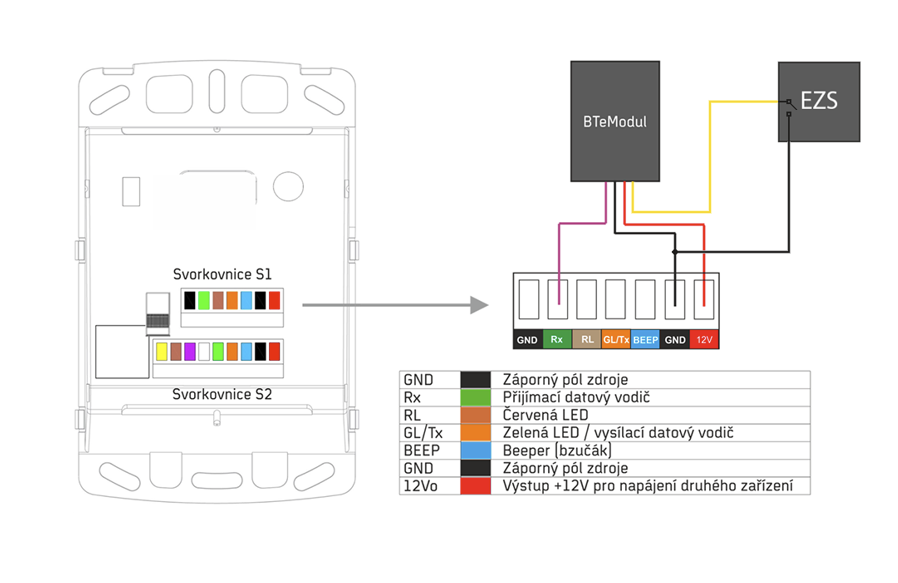
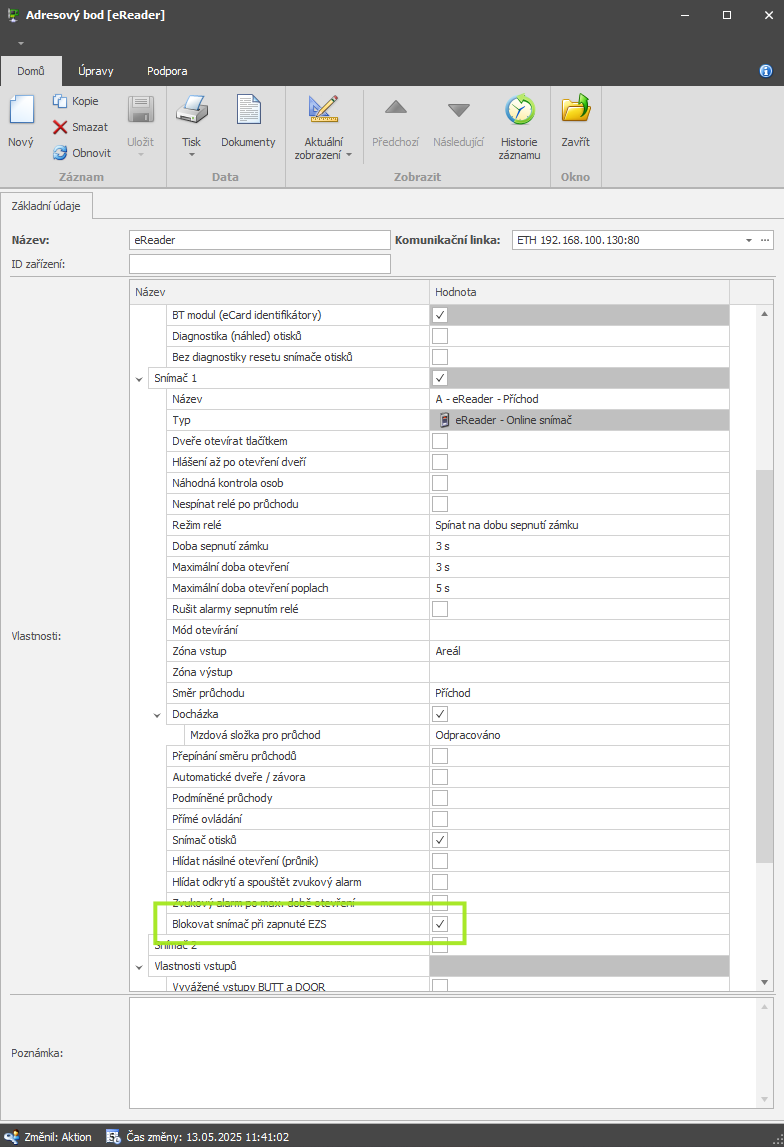
Yellow – Used to interface with the intrusion alarm system (EZS) and indicate the security status of the premises. When the yellow wire is connected to the EZS and grounded, the eReader automatically blocks the fingerprint reader, card reader, and the Bluetooth module, and displays a red LED indicator. To enable this blocking behavior, the “Block when EZS is active” parameter must be configured in the software.
Note: When connecting to the intrusion alarm system (EZS), it is not possible to use the eReader LED (red) solely for status indication while keeping the readers operational. In this configuration, the readers must be blocked, and the “Block when EZS is active” parameter must be enabled.
Connection to the ER-3×x/5×x series sensor
The BTeModule is connected to the S1 terminal block, instead of the second AXR sensor, to the Rx data lead. Another sensor (external AXR sensor) can no longer be connected to the terminal block.
BTe-Module
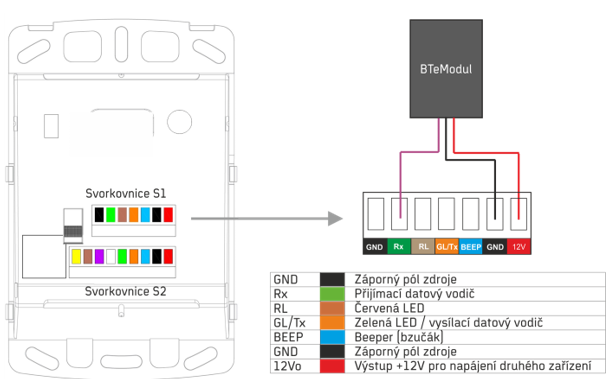
BTe-2 Modul
Connection to the AXR-1×x/2×x series sensor
The BTeModule is connected to the Wiegand output of the sensor, in parallel to the wires to the control unit on terminals D0, D1 (W0, W1).

The following rules must be observed when connecting a two-way controlled entrance with directional differentiation between zones:
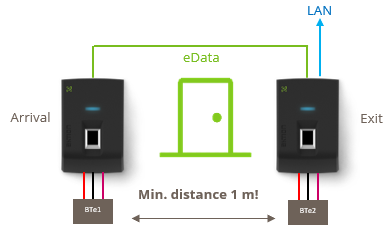
- For the eReader version, ER type sensors must be used for both directions. The second one will be connected as a SLAVE using the eData bus. BTeModules will be connected to both sensors on terminal S1.
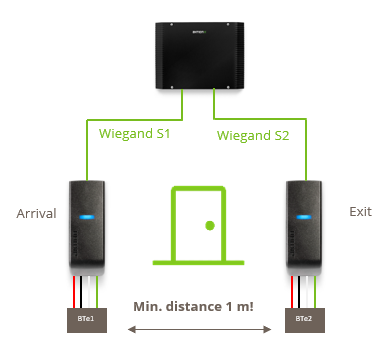
- For the version with AXR sensors and eXpander, the BTeModule connects in parallel to the Wiegand outputs of the sensors connected to the eXpander unit (KMC, MMC)
- In combination with AXR sensors, the eData and SECURE ID modes can no longer be enabled on the eXpander.
- The BTeModule can also be connected to the eXpander unit via Wiegand interface separately (without sensor). It can be used e.g. for entrances where no sensor is needed and control is only via the eCard application.
In order to prevent the sensors from influencing each other, the installation distance between the sensors must be at least 1 m! DO NOT place the sensors on a common wall opposite each other. Always install the sensors „crosswise“ (see Fig. ) so that the recommended distance between the sensors is maintained.
Fig: Recommended placement of sensors with BTeModules with bilateral input.

Note: In the settings of the eCard mobile app, you need to set the reading range to the optimal value to avoid unwanted reading of the sensor on the other side of the door.
NOTICE:
After connecting the BTeModule to the sensor, the „BT Module (eCard identifiers)“ parameter must be enabled in the address point settings. This will activate it. If the parameter is not set, the sensor LED will be red and the sensor will not respond to eCard identifiers.
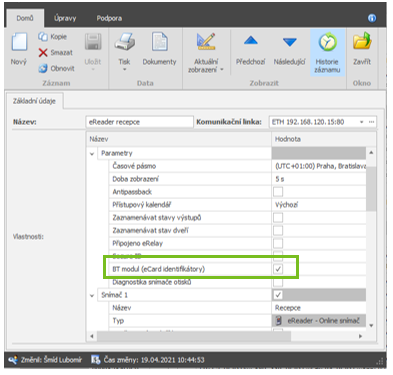
If you are using the BTe-2 module, you can enable the “Block reader when EZS is active” parameter in the address point configuration. This parameter ensures that the connected reader is disabled and cannot read identifiers while the intrusion alarm system (EZS) is armed.
To use the service application, you must have the appropriate permissions. If you do not have them, please request access through the support.
When the parameter “Block reader when EZS” is active and „Lock reader“ is enabled:
- The associated reader is blocked
- The BTe-2 Module itself is also blocked
This mechanism prevents access through the reader while the EZS is armed, thereby increasing the overall security level of the system
Requirements for Proper Functionality
To ensure this functionality is available and operates correctly, the following components are required:
- BTe-2 Module
- eCard verze 2.0.0. or higher
- Enabled „Lock reader“ parameter through the Aktion BTe configurator service application
To ensure a higher level of security, we recommend updating existing BTe-2 Modules to firmware version 1.3.1. The update can be performed using the Aktion BTE Configurator service application, although it is not mandatory.
Application eCard
For improved security, we recommend updating existing BTe-2 Modules to firmware version 1.3.1. This update can be performed using the Aktion BTE Configurator service application, although it is not strictly mandatory.
Setting the „Reader Blocking“ parameter via the Aktion BTe Configurator service application
1.Go to the reader settings
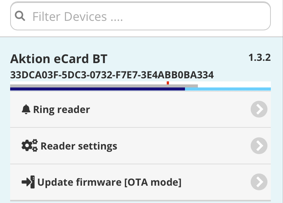
2.Scroll all the way down and locate the parameter „External Input Setting“
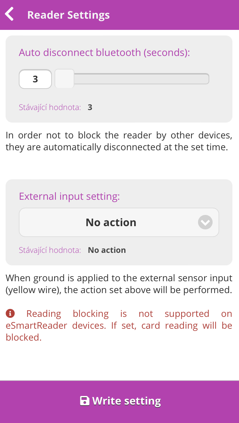
3. The default value of the parameter is** „No action“** – change it to
„Lock reader“
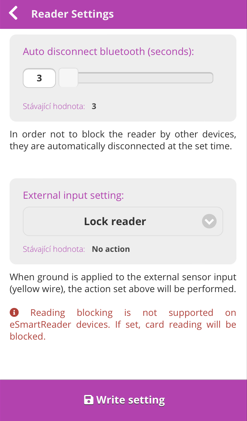
4.Click „Write settings“
An error occurred during writing, I clicked “resolve” and now the module is not responding — what should I do?
Disconnect the reader from the power supply.
Connect the grey wire to the terminal that powers the BT module.
After powering on, the BT should start working again and switch to OTA mode. You can now disconnect the grey wire.
The module now needs to be flashed with version 1.0.1 — the cleaning firmware.
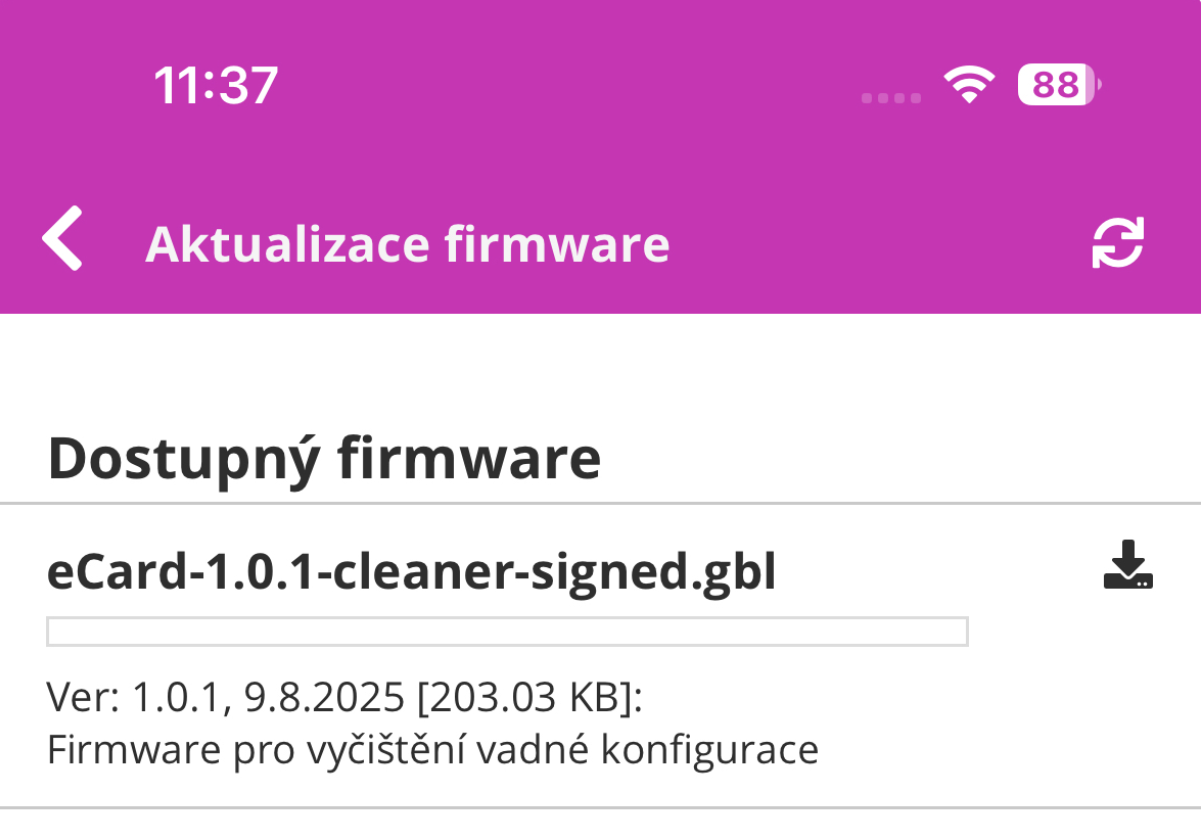
After flashing to version 1.0.1, you can update the BT back to the original version.
BTeModule placement on ER and AXR sensors
The module location is located on the bottom edge of the sensor body and is attached before the housing is fitted. In case of other module placement (under the sensor, etc.), correct operation cannot be guaranteed due to possible interference.
For newly purchased sensors, module placement can be ordered directly from the factory (recommended).
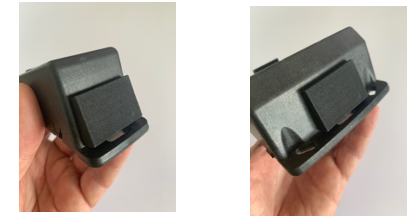
If the module is placed on the sensor from the factory, no modification is necessary. The module is attached to the sensor body with double-sided adhesive tape. On wide housing encoders, the module is mounted in the middle and restricts the middle screw hole. It is recommended to use the outermost holes to mount the sensor to the wall. In case this is not technically possible, the BTeModule can be detached, the sensor can be attached and then the module can be reattached. For narrow sensors, the module is attached to the sensor, but not attached to the sticker. The attachment must be done after the sensor is installed on the wall.
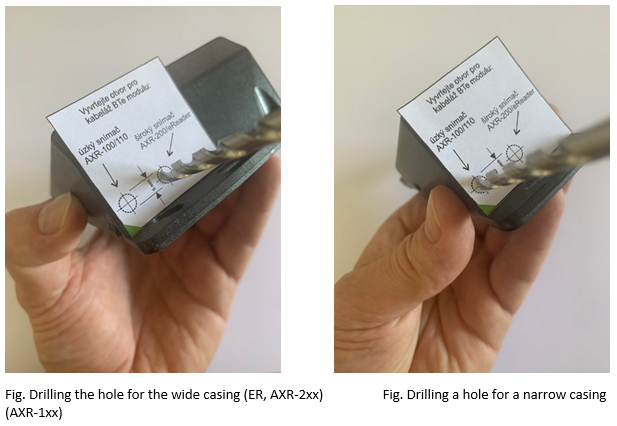
The procedure of placing the BTeModule on the sensor:
- If the module is placed on the sensor afterwards, follow the procedure below:
- Remove the paper installation template from the BTeModule package
- Place the template on the sensor body, with the left hand mark to the edge
- Drill a hole in the sensor body for the wires according to the type of housing
- Mount the sensor on the wall and test the BTeModule function
- Peel off the sticker and attach the module to the sensor body
Verification of BTeModule function
The module is set by factory default to apply the access control system to building entrance doors, turnstiles and offices.
Once connected to the system and set up at the address point, the module will start transmitting the virtual ID number over the Rx, W0 and W1 wires when a mobile device with the eCard app approaches the unit.
The maximum reading range in the factory settings is up to approx. 2 m, but users can adjust this range individually in the Aktion eCard application (parameter Range settings).
Any extension of the module's range can be done using the Aktion service mobile app (available to service organizations).
Creating and activating a virtual eCard identifier
Virtual identifiers are ordered as part of the Aktion.NEXT software license in the license calculator on the technical support server www.ecare.cz. The module is labelled AN-904 and requires entering the required number. The identifiers can be subsequently created and activated in Aktion.NEXT. Identifiers can be used repeatedly. If an activated identifier is deleted (the person is cancelled), another one can be activated in its place.
There are 2 ways to create and activate identifiers.
- Creation and activation by the system administrator
- Creation by a system administrator and activation by a person
Device ID in the Aktion eCard mobile app
To upload the virtual ID to your mobile device, you need to have the Aktion eCard mobile app from GooglePlay or AppStore installed. The mobile app generates a unique 6-digit device ID code that is required to activate the identifier.
The device ID code is displayed in the „Settings“ menu. The code can be copied to the clipboard or sent directly by e-mail.
The code must be obtained for the next activation steps.
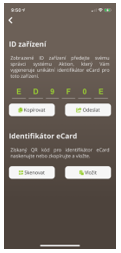
Creating an eCard and activation by the system administrator
The input is intended for users who do not have user access to Aktion. The user sends the ID code of his/her phone to the administrator. They can use the „Send“ button via email in the mobile app to do this. The administrator will then create an „active“ eCard and send the QR or activation code back to the user.
Procedure for administrators:
- For the person on the „Access – identifiers“ tab, create New and select the „eCard“ type.
- Fill in the „Device ID“ field with the number sent from the eCard mobile app.
- An optional designation can be stored in the „Registration number“ field.
- Save entry.
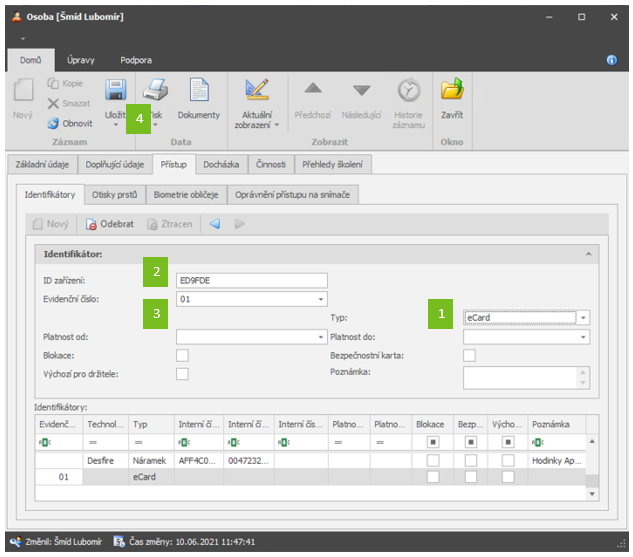
- Once the record is saved, a unique virtual identifier associated with a unique mobile device ID is generated. The identifier can then only be inserted into this mobile device.
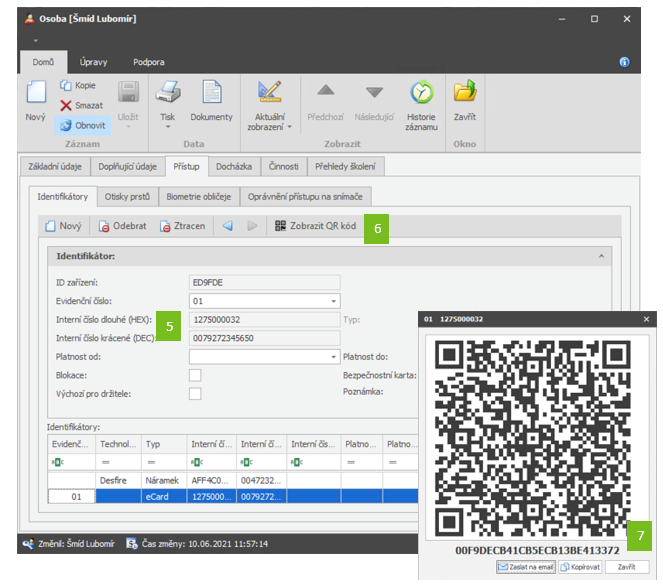
- Press the „View QR code“ button to display the activation code
- The code can be sent directly to the user by e-mail (if the Aktion software is connected to an e-mail server). Alternatively, paste into the mailbox and send manually.
The procedure for entering the identifier into the eCard application by the user:
- In its mobile app Aktion eCard retrieve the QR code that the user receives by email.
- Or, if the user is able to read the email directly on the mobile phone, just click on the active link in the message.
Creation of a blank eCard by the system administrator and activation by a person
The entry is intended for users who use authenticated access to the Aktion.NEXT WEB application (with name and password), where they can activate the identifier themselves. In this case, they do not need to send the phone ID to the administrator. In this case, the access system administrator will only issue the user an „empty“ (inactive) eCard. To activate it, the user must log in to the Aktion web application.
Procedure for administrators:
- For the person on the „Access – identifiers“ tab, create New and select the „eCard“ type.
- Save entry.
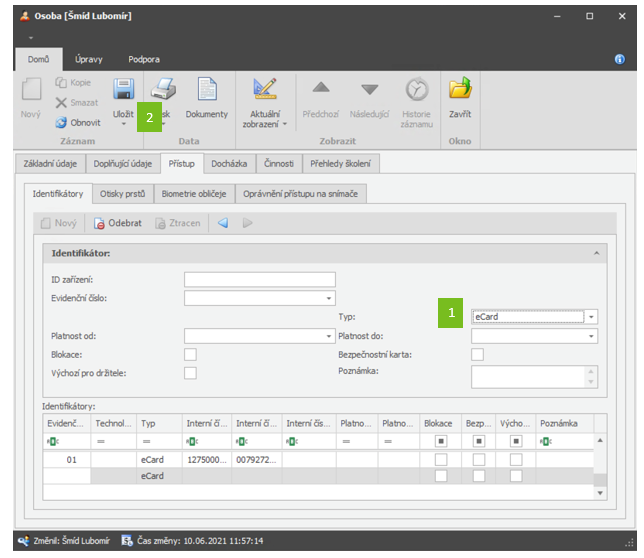
Procedure for users:
- Log in to the Aktion.NEXT web application and in the top bar of the user settings display the option „Activate eCard“
- Copy the device ID from the Aktion eCard mobile app into the displayed form.
- Read the displayed QR code in the Aktion eCard mobile app. If the QR code cannot be retrieved, copy the activation code displayed (below the QR code) to your clipboard and then paste it into the eCard app via the clipboard.
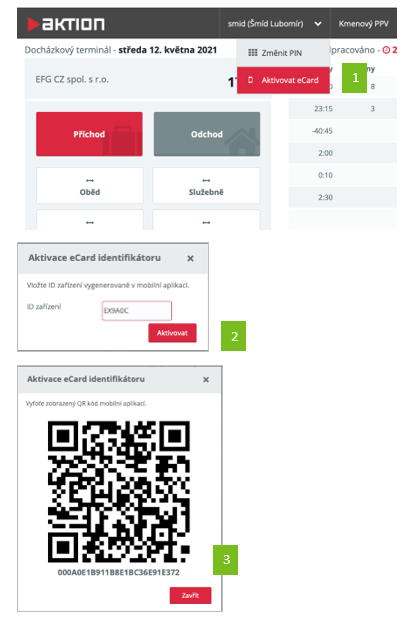
Important NOTICE:
For security reasons, the „Activate eCard and display QR code“ function can only be performed once!!!! If the user does not enter the displayed QR or activation code into his/her mobile device, the action cannot be repeated. They must contact the system administrator who will delete the identifier and issue a new one.
eCard mobile app
According to the latest findings, operating system manufacturers limit the running of applications in the background (security, etc.), this cannot be influenced. For this reason, we recommend using eCard only running in the foreground.
The app is available for iOS (11.0 or higher) and Android (5.1 or higher) platforms. In detection mode, it continuously scans BTeModules in range, establishes connectivity when approached, and passes an identifier number to the BTeModule. The BTeModule sends the eCard number to the Aktion system, which evaluates the validity and allows/disallows the holder's entry according to the access permissions. At the time of establishing connectivity between the application (phone) and the BTeModule, no other user can establish connectivity. Therefore, users cannot interact with each other and the device cannot read multiple eCards at the same time.
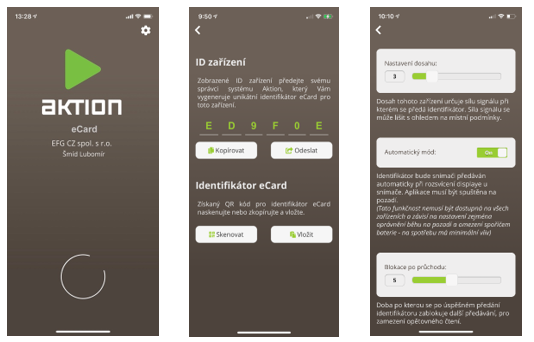
Range settings
Specifies the „reading“ distance over which the identifier can be transmitted between the phone and the BTeModule. A value of 10 represents a reading distance of approx. 2 m, a value of 1 represents a distance of approx. 3 cm. These values are valid at the factory settings of the BTeModule. The values are informative and may vary depending on the environment and the number of Bluetooth devices in the vicinity. If the module is reset by the service application, this value defines the possible reading range from-to depending on this setting.
Automatic mode
On – the application sends the identifier when approaching the BTeModule reading field /*
Off – the identifier is sent after the user presses the button.
/* Allows you to pass the identifier automatically, even when the app is running in the background (at least the phone display must be activated). However, this feature is only available on certain types of mobile devices (which allow active applications to run in the background) and should always be tested with the phone model you are using. Passing the identifier in the background may take longer than it does when running the app in the foreground.
Blocking after passage
After a set time (sec.), the repeated transmission of the identifier is disabled to prevent re-reading when passing through the door.
Notification when an identifier is passed
The establishment of connectivity with the BTeModule and the transfer of the identifier is notified by a short vibration of the mobile device.
Application permissions
To use the eCard virtual card on a mobile phone, you must enable permissions for GPS location, Bluetooth and more. All necessary permissions can be found in the AppStore or Google Play.
Unique Device ID
When creating an eCard, the identifier is created based on the unique ID of the mobile phone. This ID is different on each phone and so the identifier cannot be used on multiple devices. The identifier is not transferable. To use it on another device, a new eCard identifier must be created, see chapter Creating and activating a virtual eCard identifier.
Mobile app states
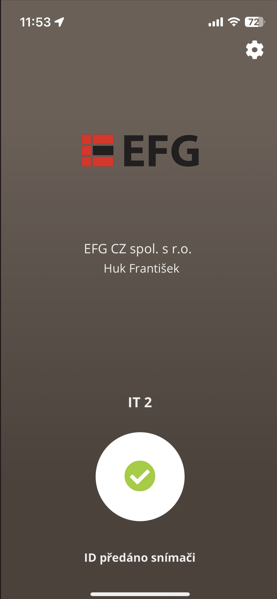
1. ID passed to sensor – Bluetooth module passed the ID to the access sensor
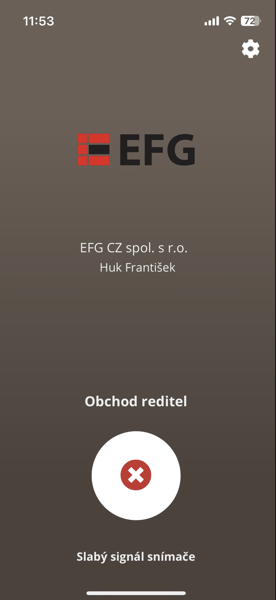
2. Weak sensor signal – set a longer range on the sensor
using the BTW configurator service application
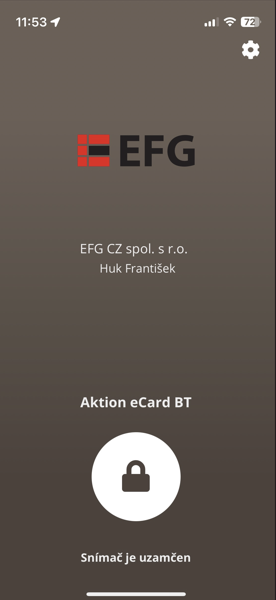
3. Lock – the sensor is blocked from the EZS and does not
pass the identifier to the access sensor (only for eReader)
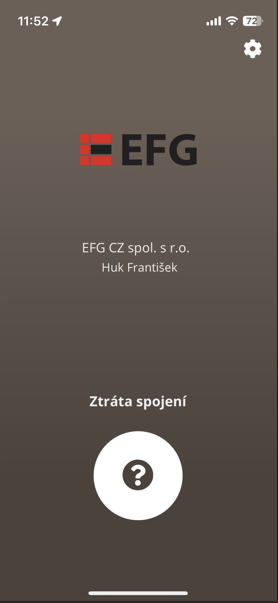
4. Connection lost – the application passed the identifier
to the Bluetooth module, but the module did not return the information about
passing the identifier to the access sensor
Service applications
It will be available during 4Q/2021.